Exercises

Home | Resources | Exercises

HOW SPECIAL EXERCISES CAN REDUCE BACK & NECK PAIN

What do exercises have to do with making a sore back or neck feel better?

For most people with back or neck pain, the last thing you would think to do is more activity. Years ago, a New Zealand physical therapist named Robin McKenzie noticed that some of his patients with herniated discs had relief of pain symptoms simply by bending over and extending. Since then, McKenzie flexion and extension exercises have been used by back pain clinics around the world to help people recover from back pain without surgery.

The back is composed of vertebrae which are separated by soft discs that act as shock absorbers. Think of the disc like a jelly donut between the vertebrae. The discs can move forward, backwards, sideways, or can simply protrude out in either direction. The disc can also rupture or cause the jelly to leak out. The disc protruding from the vertebrae is the herniation and a loss of the jelly causes the vertebrae to lose height and move closer together. The herniated disc may come into contact or touch the nerve roots or spinal cord and cause pain in the area of the herniation or numbness down the arms or legs.

Here’s how these exercises work.

Many herniations occur in the back of the disc wall. Special extension exercises, where the person increases the arch of their back by moving their shoulders backward, can compress the backside of the disc, which in turn creates a vacuum towards the front of the disc. It is believed that this vacuum can suck the herniation back inward.

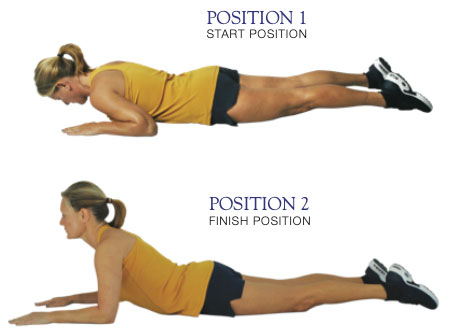
Extension Exercise For Relief of Back Pain | PRESS UP, SPHINX

Begin by lying flat on your stomach with your elbows bent and your hands flat on the ground under your shoulders, as seen in POSITION 1. Keep your back and hips relaxed, then use your arms to press your upper back and shoulders up. Hold the press-up POSITION 2 for two seconds. Then slowly return to POSITION 1. Repeat for 10 repetitions.

Monitor for signs of centralization. If your symptoms are moving toward the center of your spine, that’s a sign the press-up exercise may be helpful for you. If your symptoms don’t change, or get worse as you press up, you may need to try the prone press up with hips off-center: Lie on your stomach and slide your hips to one side and your feet to the opposite side (usually, your hips should slide away from your painful side). When your hips are offset to one side, perform the press-up exercise.

Extension Exercise For Relief of Back Pain | PRESS UP (advanced)

Start from the Sphinx position previously described on page 3. Continue to raise your upper body by supporting yourself on your hands and extending your arms slowly, as seen in POSITION 1. You still want your pelvis to maintain contact with the floor and create an arch in your lower back. Hold the position with your arms extended for several seconds and then return to POSITION 1. Repeat for 10 repetitions.

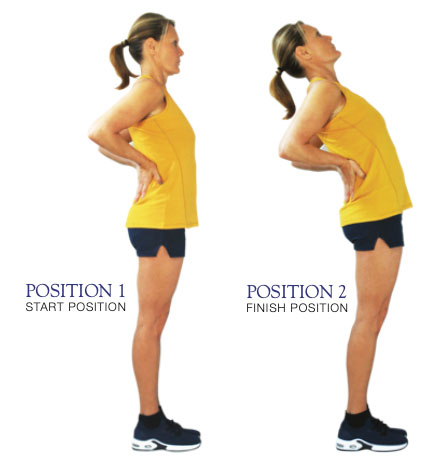
Extension Exercise For Relief of Back Pain | STANDING BACK EXTENSION

This exercise can also be used as an alternative to press-ups when you’re in a situation that doesn’t allow you to be flat on the floor, but you need to extend your spine.

1. Stand with your feet shoulder-width apart.
2. Place your hands on the small of your back.

3. Slowly bend your spine back as far as you comfortably can.
4. Hold the end position for a few seconds, then return to a fully upright position.

Repeat for 10 repetitions.

Extension Exercise For Relief of Back Pain | THE DOG

Start on all fours as in POSITION 1, keeping your back straight.

Then create an arch in your lower back by lowering your abdomen toward the ground, while at the same time raising your head, as in POSITION 2. Hold for 10 seconds. Go back to starting POSITION 1. Repeat for 20 repetitions.

Extension Exercise For Relief of Back Pain | THE CAT

Start on all fours as in POSITION 1, keeping your back straight.

Then arch your back upward and lower your head at the same time as in POSITION 2. Hold for 10 seconds. Go back to starting POSITION 1. Repeat for 20 repetitions.

Stretching Exercise For Relief of Back Pain | PIRIFORMIS STRETCH (floor)

Lie down with arms outstretched as in POSITION 1.

Keep your shoulders as flat as possible as you raise your right knee up, then slowly let the knee fall across your body to the ground. Hold for 30 seconds. Return to POSITION 1.

Keep your shoulders as flat as possible as you raise your left knee up, then slowly let the knee fall across your body to the ground. Hold for 30 seconds. Go back to POSITION 1. Repeat for 10 repetitions alternating knees.

Core Strengthening Exercise | PELVIC TILT & PELVIC BRIDGE

Lie on the floor with your knees bent and your feet flat on the floor, as in POSITION 1. Extend your arms alongside your torso, palms facing down. The back of your head should be touching the ground and your neck should be aligned with your spine. Allow your back to maintain a natural curve, leaving space between your lower back and the ground. You should be able to slide your hand into this space. Inhale. As you exhale, engage your abdominal muscles, allowing that action to tilt your tailbone upward and close the space between your lower back and the ground. You’ll feel a gentle stretch of your lower back. Inhale, allowing your spine and pelvis to return to the original position. Repeat for 5 to 10 repetitions

Pelvic Bridge, start in POSITION 1, raise your hips upward so your back forms a straight line. Tighten your stomach muscles as you do this exercise. Hold for 5 seconds. Repeat for 10 repetitions.

Extension Exercise For Relief of Back Pain | ADVANCED BACK STRETCH

Start on all fours as in POSITION 1.

Raise your left leg extending it backwards while at the same time raise and extend your right arm in front of you as in POSITION 2. Hold for ten seconds.

Repeat for 10 repetitions alternating your arm and leg.

Extension Exercise For Relief of Back Pain | SUPERMAN

Lie on your stomach with arms extended in front of you as in POSITION 1.

Raise your arms in front and legs behind you. Tightening your core, back, glutes, and thighs, lift your arms and the tops of your thighs a few inches off the ground. Hold for several seconds before lowering your arms back to POSITION 1. Repeat for 10 repetitions.

Another exercise is to raise your right leg and left arm for 5 seconds, then alternate by raising your left leg and right arm, as in POSITION 3. Hold for several seconds. Repeat for 10 repetitions alternating your arm and leg.

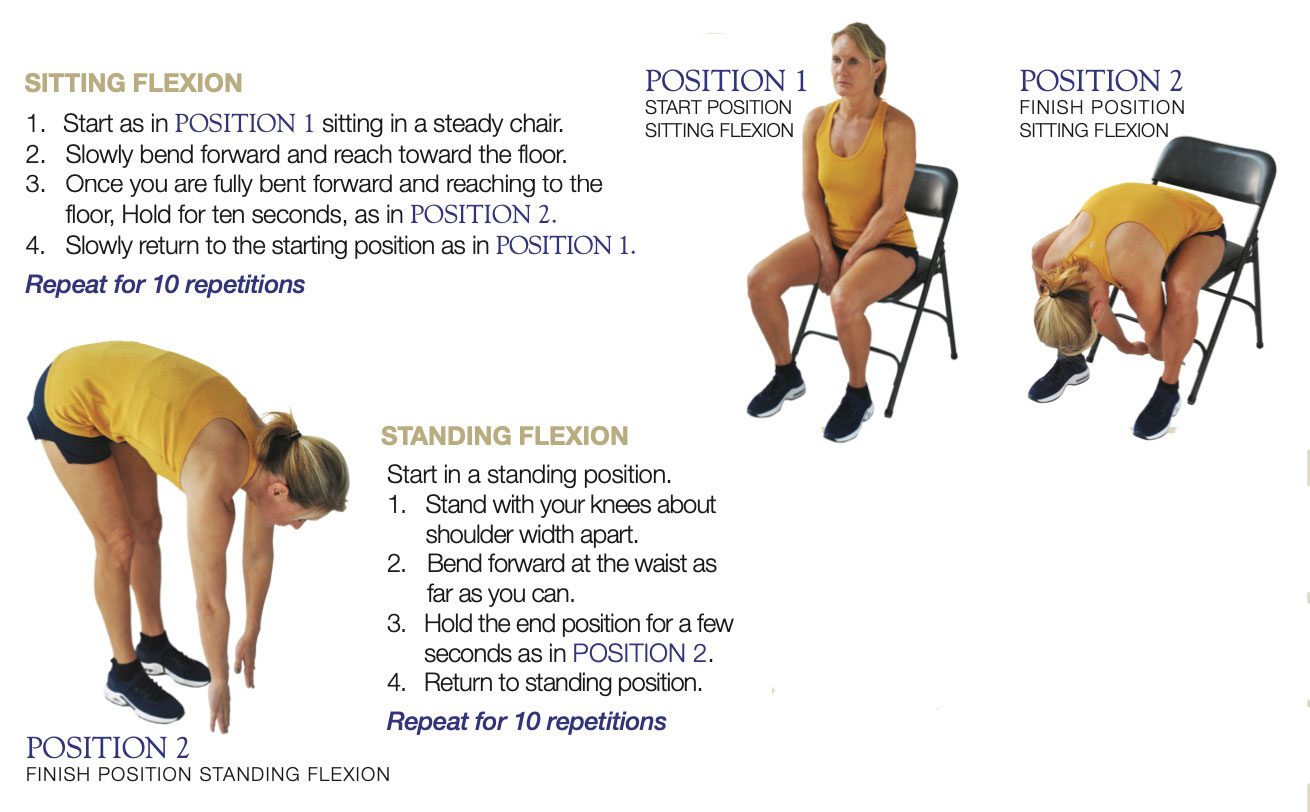
Flexion Exercise For Relief of Back Pain | STANDING & SITTING FLEXION

SITTING FLEXION

1. Start as in POSITION 1 sitting in a steady chair.
2. Slowly bend forward and reach toward the floor.
3. Once you are fully bent forward and reaching to the
floor, Hold for ten seconds, as in POSITION 2.
4. Slowly return to the starting position as in POSITION 1.

Repeat for 10 repetitions.

STANDING FLEXION

Start in a standing position.

1. Stand with your knees about shoulder width apart.
2. Bend forward at the waist as far as you can.
3. Hold the end position for a few seconds as in POSITION 2.
4. Return to standing position.

Repeat for 10 repetitions.

Flexion Exercise For Relief of Back Pain | STRETCH TO FOOT

Sit on the floor with your back straight and arms extended. Leave your right leg extended in front of you. Bend your left knee so your left foot is in proximity or touching the side of your right knee, as in POSITION 1.

With arms extended in front of you lean forward as far as you comfortably can, while slowly exhaling as in POSITION 2.

When you reach as far as you can comfortably, hold for 30 seconds, then relax. Return to POSITION 1 inhaling as you do.

Repeat for 10 repetitions, alternating legs.

Flexion Exercise For Relief of Back Pain | KNEE LIFT

Lie flat with both legs and feet on the ground as in POSITION 1.

Raise your right knee upward and towards your chest, as in POSITION 2. With your right hand, grasp your right knee and pull it towards your chest, hold for 10 seconds as in POSITION 3.

Repeat for 20 repetitions, alternating legs.

Flexion Exercise For Relief of Back Pain | DOUBLE KNEE LIFT

Lie flat with both legs bent and your feet flat on the ground as in POSITION 1.

Raise both your knees upward and towards your chest, as in POSITION 2. With both hands, grasp your knees and pull them towards your chest. Hold for 10 seconds as in POSITION 3.

Repeat for 20 repetitions, alternating legs.

Core Strengthening Exercise | ABDOMINAL CRUNCH & OBLIQUE CRUNCH

ABDOMINAL CRUNCH

1. Lie on the ground as in POSITION 1. Keep knees bent and feet planted to the ground.
2. Fold your arms crossed over your chest.
3. Exhale and lift your shoulders 6” off the ground
as in POSITION 2, hold for 1 second.

Do not over-extend to a full sit up. Repeat for 20 repetitions.

OBLIQUE CRUNCH

Follow above instructions Abdominal Crunch 1 & 2.

3. Exhale and lift your right shoulder 6” off the ground as in POSITION 3. Hold for 1 second.

Do not over-extend to a full sit up. Repeat for 10 repetitions, alternating shoulders.

Core Strengthening Exercise | ADVANCED ABDOMINAL EXERCISE

While lying on your back, raise your legs approximately two to three feet off the floor with your knees slightly bent and your feet together as in POSITION 1.

Place your hands to the sides of your head, but do not utilize your hands to lift your head up while doing this exercise. Utilizing muscles in your upper back, shoulders and chest, lift your shoulders four inches off the ground and hold for three seconds exhaling as you move, as in POSITION 2. Then lower your head and shoulders inhaling as you do.

Repeat for 10 repetitions.

Core Strengthening Exercise | BENT KNEE TWIST

Lie on the ground, keep your knees bent, feet on the ground, with your arms out to your sides as in POSITION 1.

Now bring both knees to one side, hold a moment as in POSITION 2.

Now return to POSITION 1, twist to the other side as in POSITION 3.

Hold a moment, then return to POSITION 1. Repeat for 20 repetitions.

Core Strengthening Exercise | HIP RAISE PLANK

Lie face down with your forearms on the floor, with your legs extended and your feet together as in POSITION 1.

Push into your forearms as you raise your body, so it forms a straight line from your head and neck to your feet. (Do not let your hips rise or sag) Keep your gaze down and hold this position as you engage your abdominal muscles as in POSITION 2.

Take steady even breaths, then lower your head and shoulders inhaling as you do. Try to maintain the position for up to 30 seconds and then lower your body and rest. Repeat for 10 repetitions.

Stretching Exercise to Increase Flexibility | HAMSTRING STRETCH

Lie on your back as in POSITION 1. Loop a belt or rubber band over one foot.
Utilizing the belt or rubberband, keep the leg straight and bring the leg straight up. Holding the leg straight up for 10 seconds. Lower the foot and do the same with the other leg. Do 20 repetitions so that each leg has been raised, held for ten seconds, and then lowered 10 times.

The goal is to bring your leg up high enough that you can touch your toes. With repetition you may even be able to bring your straight leg towards your head. But you don’t have to go that far to get a good stretch.

Repeat for 20 repetitions, alternating legs.

Neck Flexibility Exercise | SHOULDER SHRUGS

From a relaxed standing position as in POSITION 1. Keep your head straight, lift your shoulders upward and hold for 5 seconds, as in POSITION 2. Then lower your shoulders back to POSITION 1.

Repeat for 20 repetitions.

Neck Flexibility Exercise | BACKWARD NECK GLIDE | FORWARD NECK GLIDE

BACKWARD NECK GLIDE

While standing straight, and looking straight ahead with arms down at your sides as seen in POSITION 1, Slowly move your head backwards without tilting your head as seen in POSITION 2. Hold your head back for 5 seconds. Then slowly move your head forward as seen in POSITION 1. Repeat for 10 repetitions.

FORWARD GLIDE

Start in POSITION 1. Slowly move your head forward as seen in POSITION 3. Hold your head forward for 5 seconds. Then slowly move your head backward as seen in POSITION 1. Repeat for 10 repetitions.

Neck Flexibility Exercise | NECK FLEXION | NECK EXTENSION

NECK FLEXION

While standing straight, and looking straight ahead with arms down at your sides as seen in POSITION 1, Slowly move your chin down towards your chest as seen in POSITION 2. Hold your head forward for 5 seconds. Then slowly move your head back to POSITION 1. Repeat for 10 repetitions.

NECK EXTENSION

Start in POSITION 1. Slowly bring the base of your skull towards your back as seen in POSITION 2. Hold your head back for 5 seconds. Then slowly move your head forward to POSITION 1. Repeat for 10 repetitions.

Neck Exercise | WITH RESISTANCE

Stand straight, looking straight ahead.Using your hand to create some resistance, place your hand on your forehead as in POSITION 1. Try to flex your head forward while applying pressure with your hand to resist the movement of your head forward. Hold for 5 seconds and then relax. Repeat for 10 repetitions.

Using your right hand place it behind your head, as in POSITION 2. Try to extend your head back, while applying pressure with your hand to create some resistance. Hold for 5 seconds and then relax. Repeat for 10 repetitions.

Neck Exercises | NECK SIDE BENDS WITH RESISTANCE

Stand straight, looking straight ahead. Place your left arm on the top right side of your head and gently tilt your head to the left side as in POSITION 1. Now, while applying light pressure with your hand to the side of your head, try to raise your head to a normal position. Hold for 5 seconds and release. Repeat for 10 repetitions, alternating sides.

Standing straight, looking straight ahead. Place your left hand against the left side of your head and apply gentle pressure, while trying to tilt your head to the left, as in POSITION 2. Hold for 5 seconds and release. Repeat for 10 repetitions, alternating sides.

Neck Flexibility Exercise | NECK ROTATION

Stand Straight, looking straight ahead arms down at your sides, as in POSITION 1. Slowly turn your head to the right as seen in POSITION 2. Hold for 5 seconds then return to POSITION 1. Now, slowly turn your head to the left side as seen in POSITION 3. Hold for 5 seconds then return to POSITION 1. Repeat for 10 repetitions, alternating sides.

Neck Flexibility Exercise | NECK SIDE STRETCH

Stand Straight, looking straight ahead arms down at your sides, as in POSITION 1. Slowly tilt your head towards your right shoulder, as in POSITION 2. Hold for five seconds and return to POSITION 1. Then slowly tilt your head to your left shoulder, as in POSITION 3. Hold for five seconds and then return your head to POSITION 1. Repeat for 10 repetitions, alternating sides.

Core Exercises | STANDING STRETCH, SIDE TO SIDE

Stand Straight, with hands above your head, as in POSITION 1. Slowly tilt your arms and bend at the waist toward your right as seen in POSITION 2. Hold for 5 seconds, then return to POSITION 1. Now, return to POSITION 1. Slowly tilt your arms and bend at the waist toward your left as seen in POSITION 3. Hold for 5 seconds, then return to POSITION 1. Repeat for 10 repetitions, alternating sides.

Stretching Exercise for Relief of Back Pain | PIRIFORMIS STRETCH, STANDING

This is a good stretching exercise when you can not lay on the ground. Start by raising your left knee in front of you. Use your hands to hold your
leg in place, as in POSITION 1.

Slowly swing your knee across your body, and hold for 5 seconds, as in POSITION 2. Repeat for 5 repetitions, alternating sides.

Note: This standing piriformis stretch is popular with golfers before and during a round of golf.

Preventing Back Injury | ROTATIONAL STRETCH FOR TENNIS & GOLF

To reduce the risk of strain, do this stretching exercise before playing tennis or golf to loosen up. Standing straight, with feet shoulder width apart, lay a golf club across the back of your shoulders and grasp each end of the club with your hands, as in POSITION 1.

Maintaining your foot positions gently rotate your shoulders to the left and to the right twisting your hips, as in POSITION 2. Continue slowly rotating to the left and right for several minutes.

Preventing Back Injury | HOW TO LIFT CORRECTLY (two options)

By placing one knee on the ground and centering the item to be lifted in front of you, as seen in POSITION 1; you can utilize your arms to lift the item to mid-thigh, then begin to stand up, keeping your back straight (do not hunch over the item). This enables your leg and arm muscles to bear the weight, and not your back.

An alternative method would be to squat in front of the item keeping your back straight, and then lifting the item to about knee height with your arms, as seen in POSITION 2. Still maintaining a straight back move to a standing position.

Utilizing your legs when lifting items, minimizes the strain on your back muscles, thus preventing one of the most common causes of back pain.

CONTACT US TODAY